Video Overview
What is eCourtDate?
eCourtDate is an omni-channel communication platform used by justice and government agencies. Agencies can automatically send and receive two-way messages via texts (SMS), email, and voice calls.
Our API allows developers to integrate eCourtDate's scheduling and messaging capabilities into their own applications and workflows.
eCourtDate Agency Required
API Documentation
API documentation is available at docs.ecourtdate.com. The documentation provides information on the available resources, endpoints, and parameters, as well as examples of API requests and responses.
API Regions
We use multiple regions to provide a scalable, fast service for all of our users.
Staging Region:
Testing environment where outbound messages, data reporting, and payment processing are simulated.
API Base URL: https://staging.api.ecourtdate.com
Application URL: https://staging.ecourtdate.com
Production Regions (recommended for single-region users):
- https://us-east.api.ecourtdate.com
- https://us-west.api.ecourtdate.com
- https://us-south.api.ecourtdate.com
- https://us-texas.api.ecourtdate.com
Multi-region Production URL (supports all production regions):
API Base URL: https://api.ecourtdate.com
Application URL: https://app.ecourtdate.com
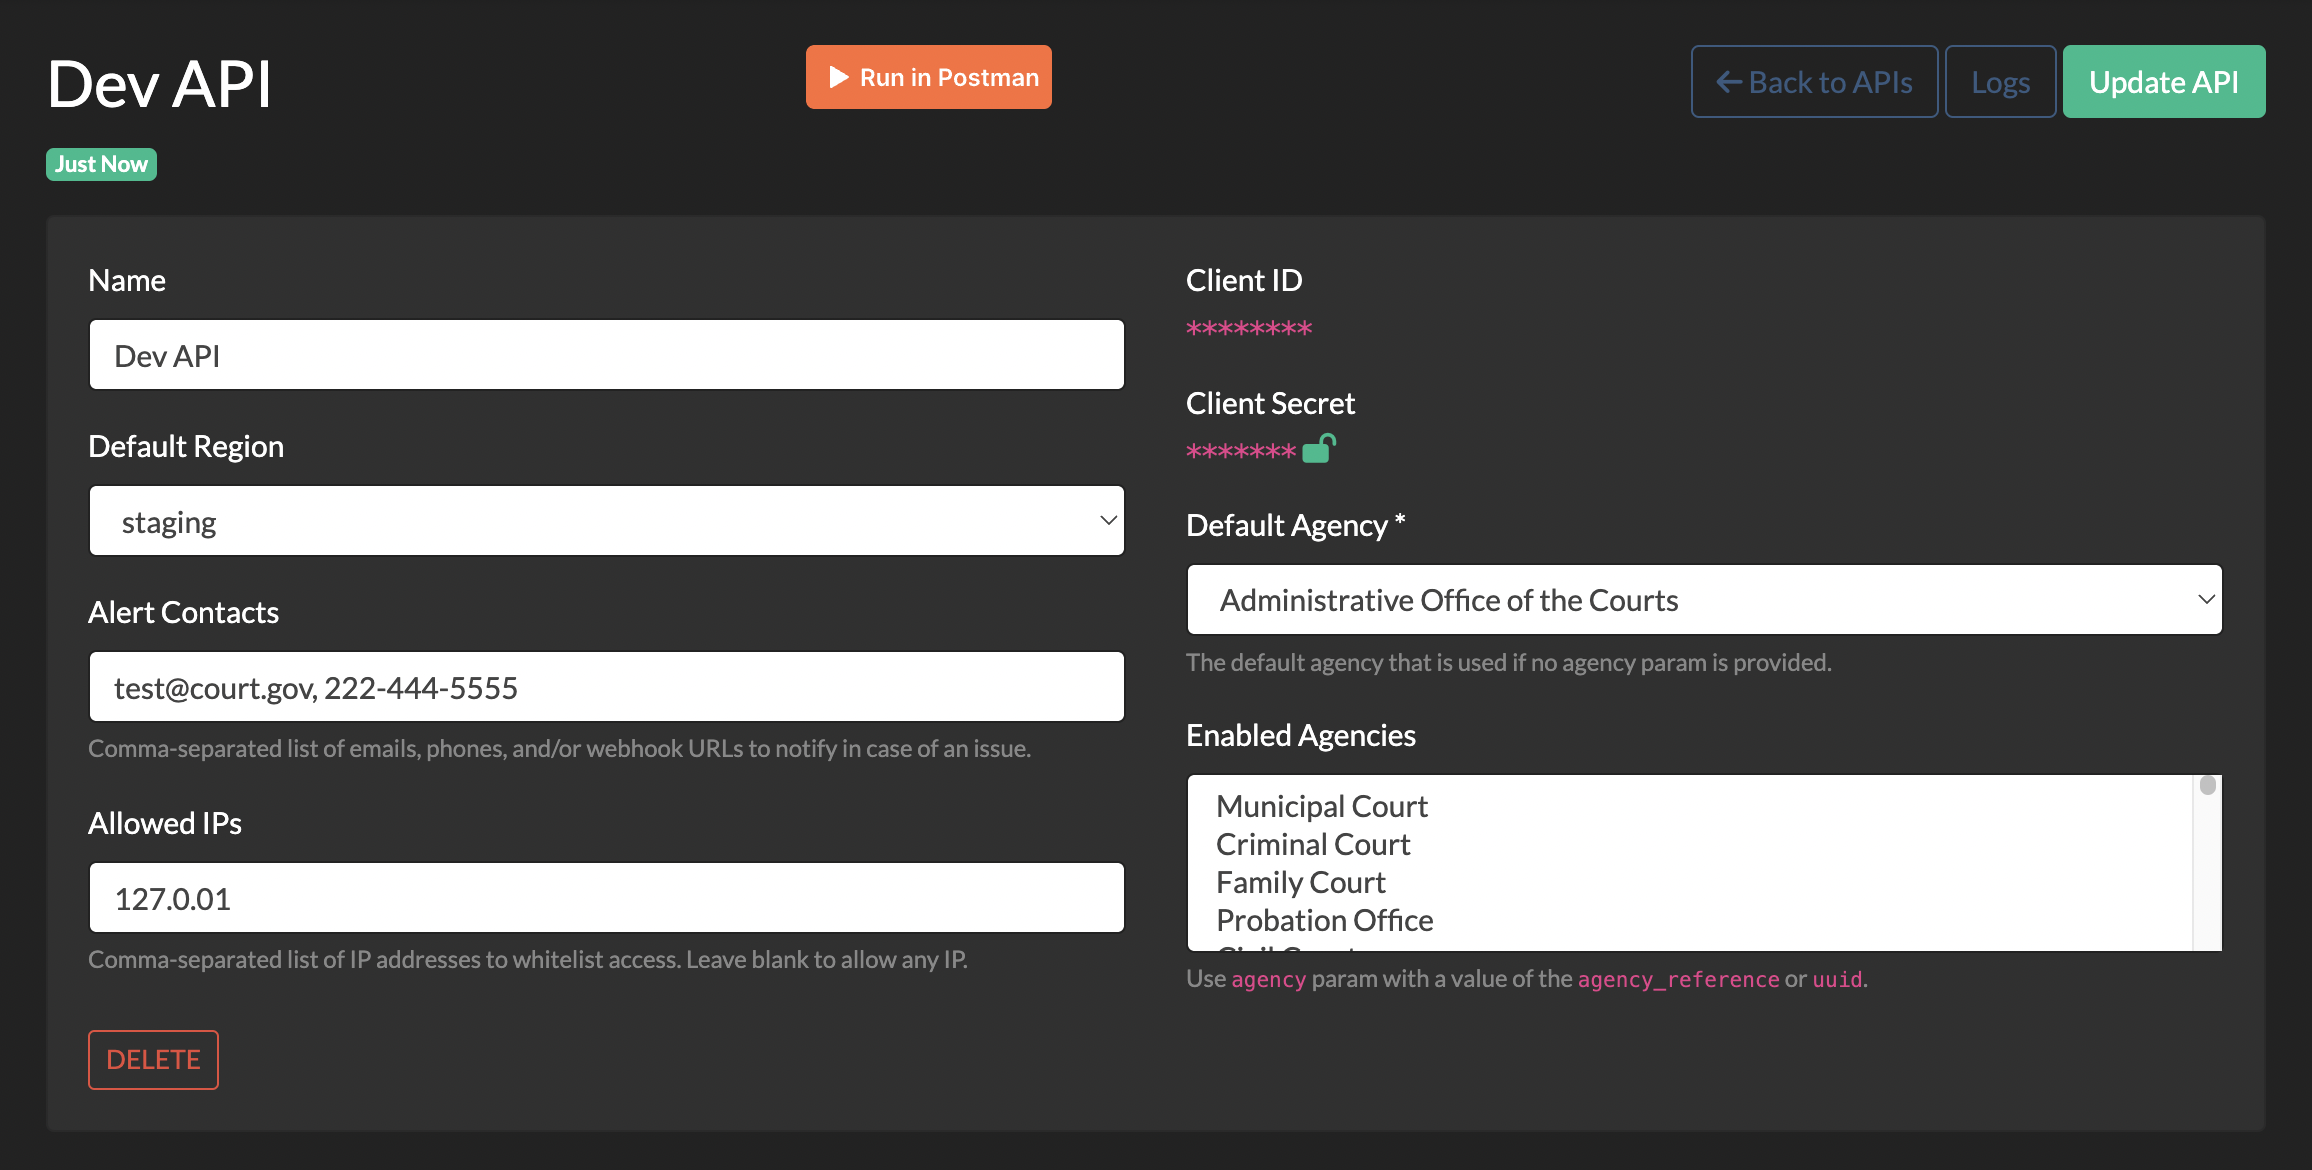
eCourtDate Console
The eCourtDate Console is where you can manage all agencies and API clients. You will need at least two clients - one for production and one for staging.
An API Client is used to authenticate API requests using an oAuth2-based Client Credentials grant.
Once signed into the Console, click on the APIs page to follow these steps:
Step 1 - Create an API Client
In the Console APIs page, click on Add API, then fill in the form to add a new API Client.
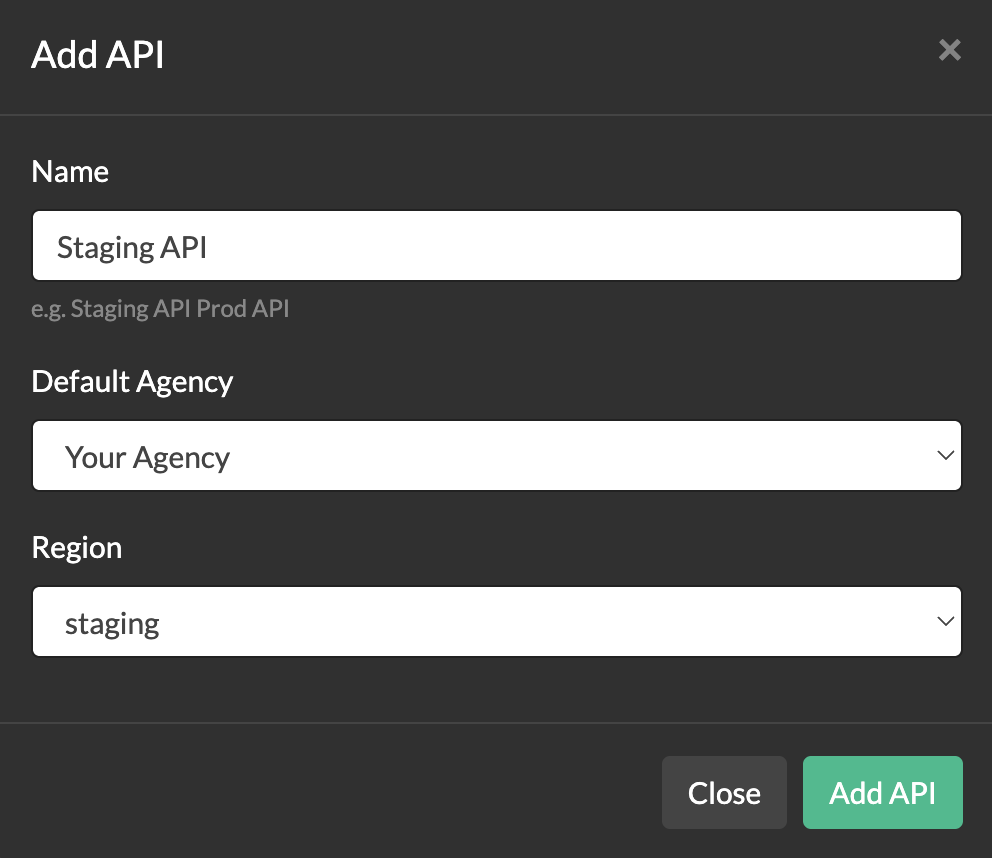
Step 2 - Configure the API Client
Single Agency configure the Default Agency. You do not need to enable additional agencies or send the agency in your requests.
Multi Agency configure both the Default Agency and Additional Enabled Agencies. You will need to send either the agency UUID or the agency reference in each request. If the additional agency is not found, then the default agency is used.
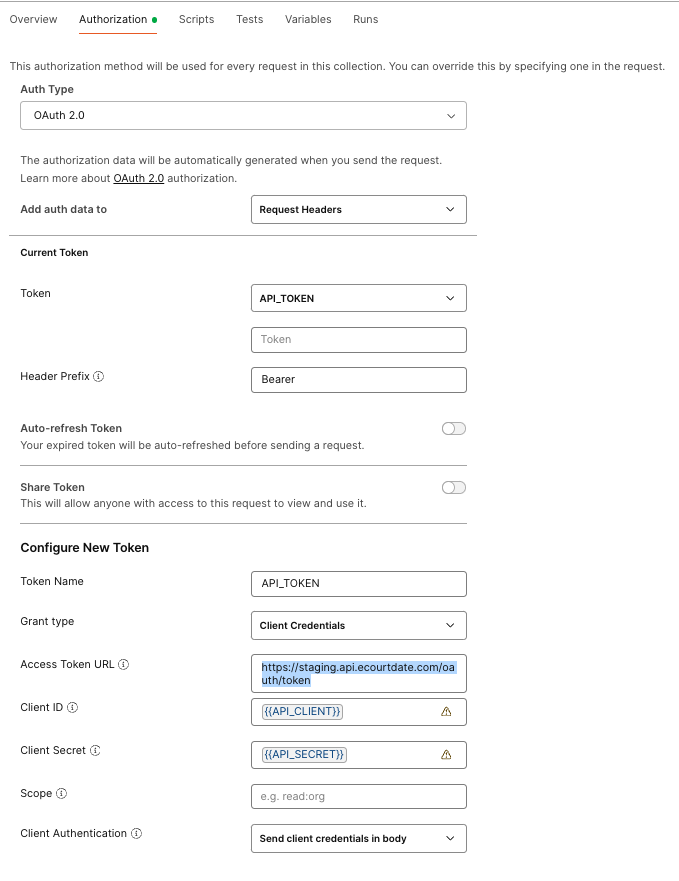
Step 3 - Request an Access Token
Copy the ACCESS TOKEN URL Client ID and Client Secret from the configured API client and request an Access Token.
Example CURL Request to Generate Access Token
    curl -X POST https://staging.api.ecourtdate.com/oauth/token \
    -H "Content-Type: application/json" \
    -d '{
      "client_id": "{client_id_value}",
      "client_secret": "{client_secret_value}",
      "grant_type": "client_credentials"
    }'
Response Body
Response Status 201
  {
  "access_token": "{access_token_value}",
  "token_type": "Bearer"
  }
Example Postman Authorization Settings to Generate an Access Token
Authentication
All subsequent API requests must include the Bearer Access Token in the Authorization header. Example:
  Authorization: Bearer {access_token_value}
  Content-Type: application/json
Step 4 - Verify Access to Agency
To verify access to an agency, use the GET /settings endpoint. Example:
Example CURL Request to Get Agency Settings
    curl -X GET https://staging.api.ecourtdate.com/v1/settings \
    -H "Authorization: Bearer {access_token_value}" \
    -H "Content-Type: application/json"
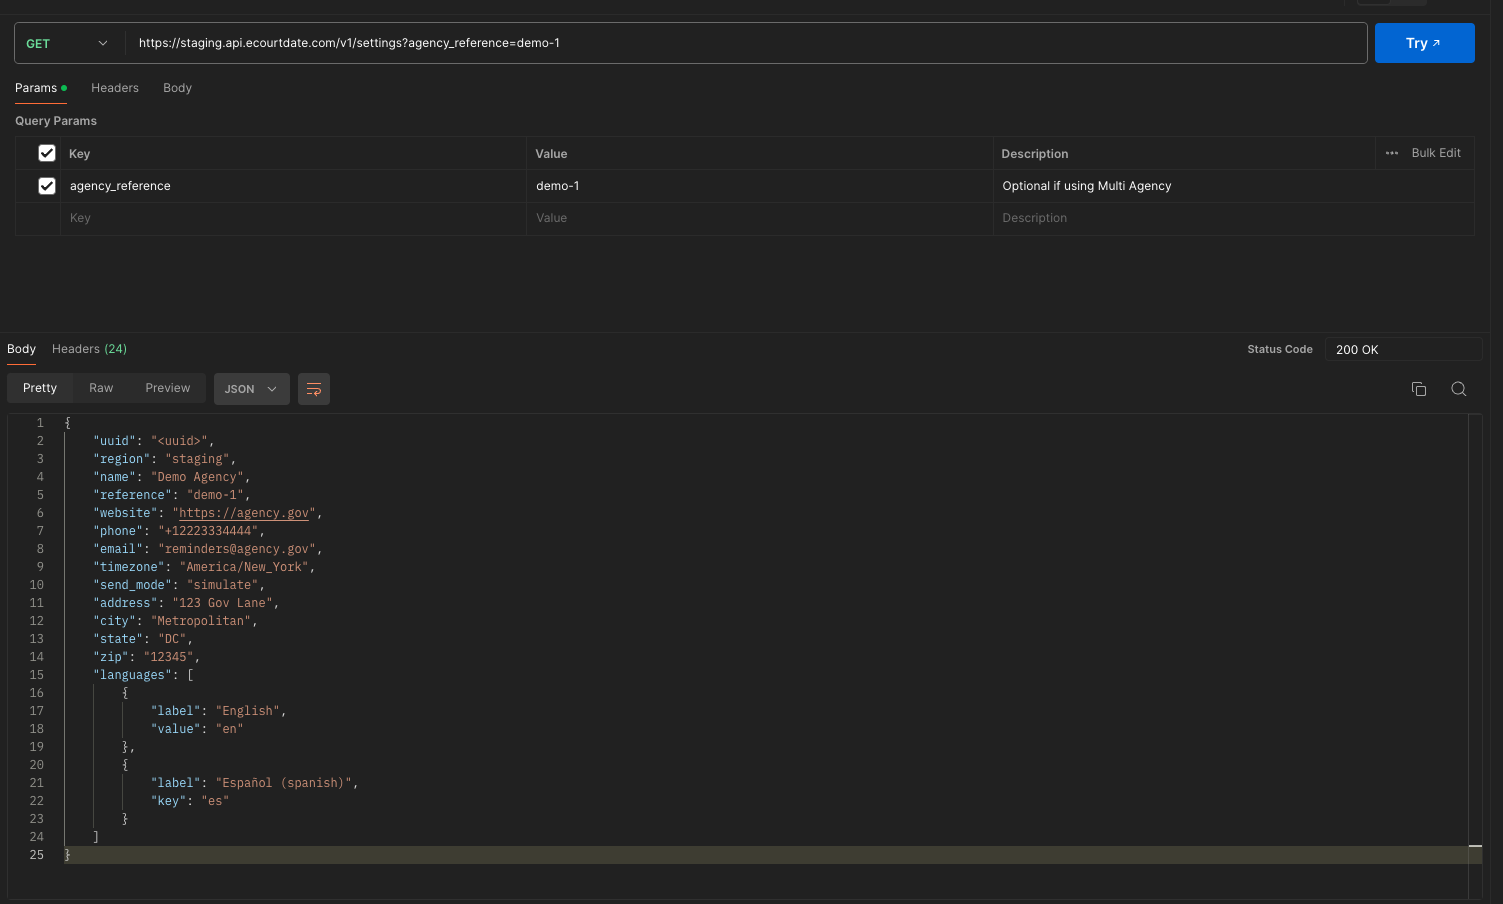
Step 5 - (Optional) How to Use Multiple Agencies
If you want to use more than one agency with the same API client, use an agency or agency_reference param
Example CURL Request to Get Agency Settings
    curl -X GET "https://staging.api.ecourtdate.com/v1/settings?agency_reference=demo" \
    -H "Authorization: Bearer {access_token_value}" \
    -H "Content-Type: application/json"
You can find the agency UUID and reference in the Console under Agencies. You can change the reference through the Admin > Settings page for the agency.
You can use the same API client for multiple agencies in the same region. You can't use the same API client in staging and production.
Example Postman Request to Get Agency Settings
Step 6 - Send Requests to the API
You can use the API to send messages, schedule events, and more. The API documentation provides information on the available resources, endpoints, and parameters, as well as examples of API requests and responses.
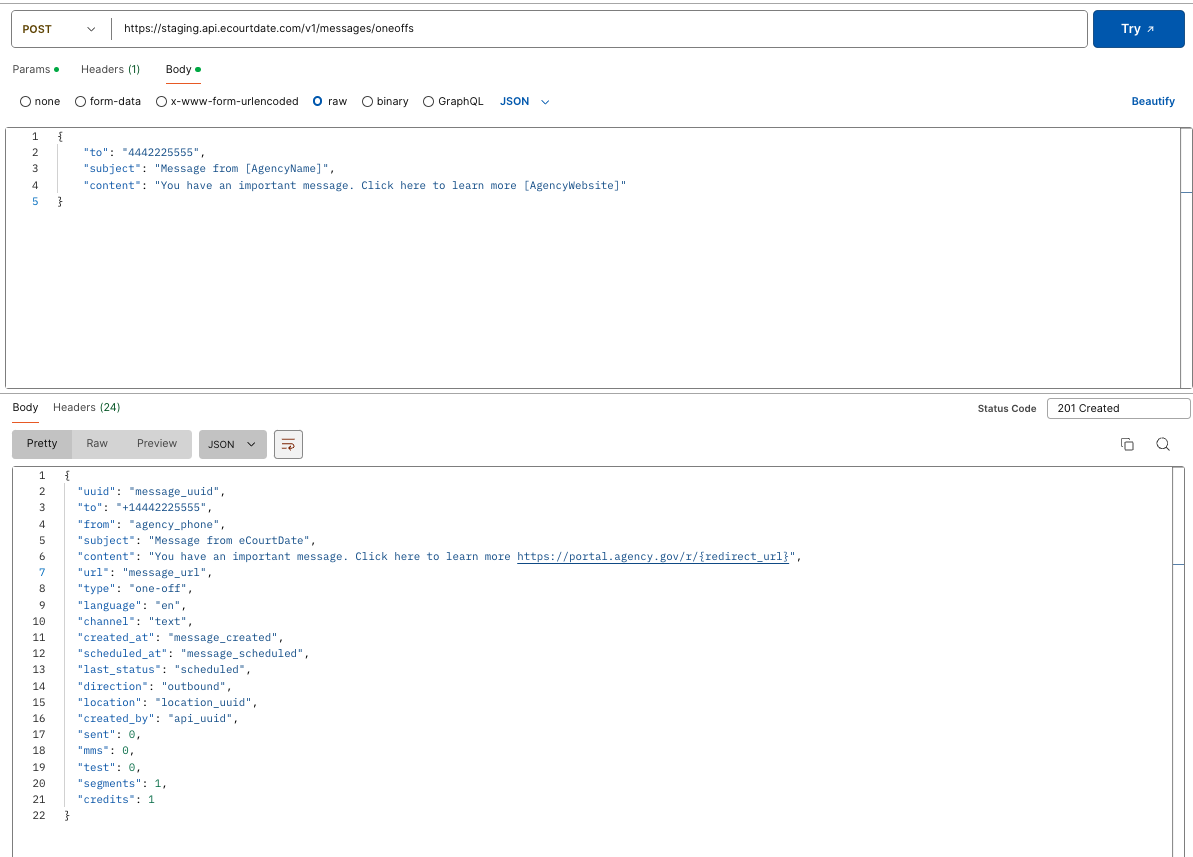
Example CURL Request to Send a One-off Message
    curl -X POST https://staging.api.ecourtdate.com/v1/messages/oneoffs \
    -H "Authorization: Bearer {access_token_value}" \
    -H "Content-Type: application/json" \
    -d '{
      "to": "1234567890",
      "subject": "You have a Message from [AgencyName]",
      "content": "Your message content here",
    }'
Phone numbers and email addresses are accepted for the to field. You do not need to use a specific format.
Response Body
Response Status 201
    {
    "uuid": "message_uuid",
    "from": "agency_phone_or_email",
    "to": "recipient_phone_or_email",
    "subject": "Your message subject",
    "content": "Your message content",
    "last_status": "scheduled",
    "sent": 0,
    "mms": 0,
    "scheduled_at": "YYYY-MM-DD HH:MM:SS"
    }
Example Postman Request to Send a One-off Message
How to Include Message Metadata
You can provide metadata to track messages in your own systems. This is useful for reporting and analytics.
The following fields are available to include in the message metadata:
- type - The type of message
- event - The event UUID or reference
- case - The case UUID or reference
- form - The form UUID or reference
If you are not using other eCourtDate features, then the following fields are available:
- client - The client UUID or reference
- payment - The payment UUID or reference
- event - The event UUID or reference
How to Track Message Opens and Delivery Statuses
You can track when a message is opened by sending a GET /opens?message={message_uuid} request.
The last_open field in the message object is updated with the date and time of the last open.
You can track the history of delivery statuses by sending a GET /messages/{message_uuid}/metas request.
The last_status field in the message object is updated with the delivery status.
You can configure Webhooks to receive real-time data for inbound and outbound messages in the Console > Webhooks page.
How to Retry Failed API Requests
API requests can fail for a variety of reasons. We recommend a retry strategy with exponential backoff or setting a maximum number of retries.
The following status codes are common reasons why you might need to retry a request.
409 Conflict
The duplicate check prevents the same message from being sent multiple times within a 30-minute +/– window. If you intend to bypass the duplicate check, you can:
- Use the skip_duplicate = true parameter when using the /messages or /messages/oneoffs endpoints
- Set a scheduled_at date and time that is greater than 30 minutes from the previous message scheduled_at
- Use the duplicate_buffer and duplicate_interval parameters to control the duplicate time window (defaults to 30 minutes before and after scheduled_at)
- Wait until after 30 minutes from the scheduled_at date and time and send the request again
- Ensure that the message content is always unique
429 Too Many Requests
You have reached the rate limit for your account. Please wait at least 1 minute before retrying the request.
If you are on a Dedicated plan, configure the Allowed IPs setting, and email help@ecourtdate.com to increase the rate limit.
503 Service Unavailable
The API is currently unavailable. Please wait at least 1 minute and try again.
504 Gateway Timeout
The request could not be completed. Please wait at least 1 minute and try again. This is usually due to a temporary network issue.
If you experience a 503 or 504 error, please email help@ecourtdate.com with the details of the request.
How to Schedule When Messages are Sent
When using the /messages/oneoffs endpoint, you can set the scheduled_at parameter to the date and time that the message should be sent. Combine with the timezone parameter to specify the timezone of the date and time.
Example CURL Request to Schedule a One-off Message
    curl -X POST https://staging.api.ecourtdate.com/v1/messages/oneoffs \
    -H "Authorization: Bearer {access_token_value}" \
    -H "Content-Type: application/json" \
    -d '{
      "to": "1234567890",
      "subject": "You have a Message from [AgencyName]",
      "content": "Your message content here",
      "scheduled_at": "2027-01-01 09:00:00",
      "timezone": "America/New_York"
    }'
How to Send Messages Immediately
Newly created messages are added to an automated queue to ensure messages are sent within carrier limits. If the message is scheduled to be sent immediately, there may still be a delay of up to 60 seconds before the message is sent.
To send a message immediately and bypass the queue, set the send_now parameter to true.
In addition, ensure that the following settings are configured under the Admin > Settings page for the agency:
Default Message Delay - set this to 0

Send Immediately - enable this checkbox

Click the Save button to apply any changes in the Admin > Settings page.
You do not need to set the scheduled_at parameter when sending a message immediately.
Note: if you are using this feature, you are responsible for ensuring that the message is sent within the carrier limits. If the message is not sent within the carrier limits, it may fail and be retried (causing a delay).
How to Resend Failed Messages
Messages are automatically retried by eCourtDate. You are not required to resend failed messages.
Common reasons why messages fail that are retried automatically:
- Temporary network issues
- Temporary spam blocks
- Volume limits reached
- Carrier or gateway issues
Messages are not automatically resent past 24 hours from the original send date and time. If the message is linked to an event, then the message is not resent if the event date and time has passed.
In the event of carrier or gateway issues that are due to an outage, retries are attempted once the issue is resolved.
To receive notifications when messages are automatically resent, use the General Settings > Issues Emails setting.
You can view carrier campaign status in Billing > Campaigns.
To learn more about carrier registration and best practices, see ecourtdate.com/carrier-registration.
To monitor message delivery and engagement, use the Reports and Data Dashboards.
If failures are due to out of service contacts, enable the Auto Run Lookups setting. This will automatically validate contacts prior to sending. If a landline is detected, the message is switched to a voice call.
Click here to view message Error Codes and Error Descriptions.
The JSON files are updated periodically to include new error codes and descriptions. You can integrate these files into your own systems to provide more detailed error messages to your users.
How to Use Automated Message Templates
Instead of manually sending one-off messages, you can provide source data to eCourtDate and utilize our automated message templates. This allows you to create clients, events, cases, and other records that trigger automated messages based on your configured templates.
Benefits of Using Automated Templates
- Centralized Message Management - Business users can update message content, timing, and delivery preferences without requiring code changes or developer intervention
- Consistency - Ensures all clients receive the same standardized messages with consistent branding and formatting
- Advanced Scheduling - Automatically sends messages at optimal times based on event dates, business hours, and message timing rules
- Multi-Channel Delivery - Seamlessly sends messages via SMS, email, and voice calls based on contact availability and agency settings
- Data Integration - Messages automatically include dynamic data from client, event, case, and payment records using template variables
- Compliance & Tracking - Built-in opt-out management, delivery tracking, and audit logs ensure compliance with communication regulations
- Workflow Automation - Trigger multiple messages based on record status changes, reminders, and follow-ups without manual intervention
- Reduced API Calls - Create records once and let eCourtDate handle all related messaging automatically
Considerations
- Initial Setup Required - Requires configuration of flows, auto messages, and agency settings before messages can be sent. Configuration can be completed manually through the agency admin or through the API.
- Less Granular Control - Individual message content cannot be customized per recipient (use one-off messages for unique content)
- Learning Curve - Requires understanding of flows, portals, locations, and template variables to configure effectively
When to Use Automated Templates vs One-Off Messages
Use Automated Templates when: You have recurring messaging needs with consistent content, multiple reminders per event, or want business users to manage message content. Ideal for structured data sources such as a Case Management System.
Use One-Off Messages when: You need to send unique, one-time messages with custom content that doesn't fit a template pattern.
Recommended Workflow
The recommended workflow is to first create clients, then create related records such as events, cases, or payments.
Real-Time vs Batch Processing
You can send data to eCourtDate either in real-time as records are created/updated in your system, or through scheduled batch processes. Both approaches are supported and have different trade-offs:
Real-Time Processing:
- Sends API requests immediately when records are created or updated in your source system
- Provides immediate feedback on success or failure for each transaction
- Ensures clients receive notifications as soon as possible
- Easier to track and troubleshoot individual record issues
- May require more robust error handling and retry logic in your application
Batch Processing:
- Sends API requests on a scheduled basis (e.g., hourly, daily, or after business hours)
- More efficient for high-volume systems with many records
- Reduces API call overhead by grouping requests together
- Allows for validation and data quality checks before sending
- May delay client notifications depending on batch schedule
- Requires a queue or staging table to track pending records
Best Practices Regardless of Approach
- Track Response Status - Always log the HTTP response status code and response body for each API request to identify and resolve issues
- Store UUIDs - Save the uuid returned in the response for each created record to enable future updates
- Handle Errors Gracefully - Implement retry logic for temporary failures (429, 503, 504) and alert mechanisms for persistent errors (400, 401, 403)
- Monitor API Logs - Regularly review logs in the Console to identify patterns or recurring issues
- Test in Staging - Always test your integration in the staging environment before deploying to production
- Use References - Include unique client_reference, event_reference, or similar references to easily identify and update records
Choose the approach that best fits your system architecture, data volume, and notification timing requirements. There is no single recommended approach - the choice depends on your specific use case.
Step 1 - Create a Client
Use the POST /clients endpoint to create a new client record. See API docs. Example:
    curl -X POST https://staging.api.ecourtdate.com/v1/clients \
    -H "Authorization: Bearer {access_token_value}" \
    -H "Content-Type: application/json" \
    -d '{
      "first_name": "John",
      "last_name": "Doe",
      "phone": "1234567890",
      "email": "john.doe@example.com",
      "client_reference": "CLIENT-12345",
      "language": "en"
    }'
Response Body
Response Status 201
    {
    "uuid": "client_uuid",
    "first_name": "John",
    "last_name": "Doe",
    "client_reference": "CLIENT-12345"
    }
Note: any phone numbers or emails provided in the initial client request will be created as a contact record. You can retrieve the contact records using the "client" or "client_reference" parameter.
    curl -X GET https://staging.api.ecourtdate.com/v1/contacts?client={client_uuid} \
    -H "Authorization: Bearer {access_token_value}" \
    -H "Content-Type: application/json"
Step 2 - Create Related Records
Once you have created a client, you can create related records such as events, cases, forms, or payments. These records can trigger automated messages based on your configured flows and auto messages. Each record can be assigned to one flow, one portal, and one location. Multiple auto messages may be triggered based on the messaging settings.
Use the POST /events endpoint to create a new event record. See API docs. Example:
    curl -X POST https://staging.api.ecourtdate.com/v1/events \
    -H "Authorization: Bearer {access_token_value}" \
    -H "Content-Type: application/json" \
    -d '{
      "client": "client_uuid",
      "case_number": "1234567890",
      "event_reference": "EVENT-12345",
      "date": "2027-02-15",
      "time": "09:00:00",
      "type": "Court Hearing",
      "description": "Preliminary hearing for case #12345",
      "status": "scheduled",
      "location": "Municipal Court",
      "flow": "Court Hearing",
      "portal": ""
    }'
Note: if you provided a unique "client_reference", you can use "client_reference" instead of "client" in the request body. You should expect that the response body will contain "client" with the UUID of the client.
The following fields can link to associated features:
- flow - Flow Name, Reference, or UUID. Otherwise uses the Default Flow
- portal - Portal Name, Reference, or UUID. Otherwise uses the Default Portal
- location - Location Name, Reference, or UUID. Otherwise uses the Default Location
If you are using multiple Flows, Portals, or Locations, we recommend using the "Reference" field for each feature. This allows the business users to use the "Name" field for client-facing labels.
Response Body
Response Status 201
    {
    "uuid": "event_uuid",
    "client": "client_uuid",
    "case_number": "1234567890",
    "event_reference": "EVENT-12345"
    "date": "2027-02-15",
    "time": "09:00:00",
    "type": "Court Hearing",
    "description": "Preliminary hearing for case #12345",
    "status": "scheduled",
    "location": "location_uuid",
    "flow": "flow_uuid",
    "portal": "portal_uuid"
    }
When you create an event, eCourtDate will automatically send messages to the client based on your configured message templates. You can configure these templates in the Admin > Settings > Templates page.
Other endpoints that support automated message templates and client assignments include:
- POST /contacts - Create contact records
- POST /cases - Create case records
- POST /payments - Create payment records
- POST /forms - Create form records
- POST /warrants - Create warrant records
- POST /bonds - Create bond records
Step 3 (Optional) - Update Clients and Related Records
If you need to update client or event information, eCourtDate will automatically resync messages based on the latest version of the data.
If you are storing the uuid of each record, you can use the PATCH endpoint to update the record directly. See API docs:
    curl -X PATCH https://staging.api.ecourtdate.com/v1/clients/{client_uuid} \
    -H "Authorization: Bearer {access_token_value}" \
    -H "Content-Type: application/json" \
    -d '{
      "language": "es",
      "status": "active"
    }'
Similarly, you can update events using the uuid. See API docs:
    curl -X PATCH https://staging.api.ecourtdate.com/v1/events/{event_uuid} \
    -H "Authorization: Bearer {access_token_value}" \
    -H "Content-Type: application/json" \
    -d '{
      "date": "2027-02-20",
      "time": "10:00:00",
      "status": "rescheduled"
    }'
If you are not storing the uuid, you can use a GET request to search for records using their unique reference properties:
For clients, use the client_reference parameter. See API docs:
    curl -X GET "https://staging.api.ecourtdate.com/v1/clients?client_reference=CLIENT-12345" \
    -H "Authorization: Bearer {access_token_value}" \
    -H "Content-Type: application/json"
For events, use the event_reference parameter. See API docs:
    curl -X GET "https://staging.api.ecourtdate.com/v1/events?event_reference=EVENT-12345" \
    -H "Authorization: Bearer {access_token_value}" \
    -H "Content-Type: application/json"
Once you retrieve the uuid from the search results, you can then use the PATCH endpoint to update the record.
When you update a client or event, all associated messages will automatically resync to reflect the latest information. This ensures that clients always receive accurate and up-to-date notifications.
See the API documentation for more information on these endpoints and available parameters.
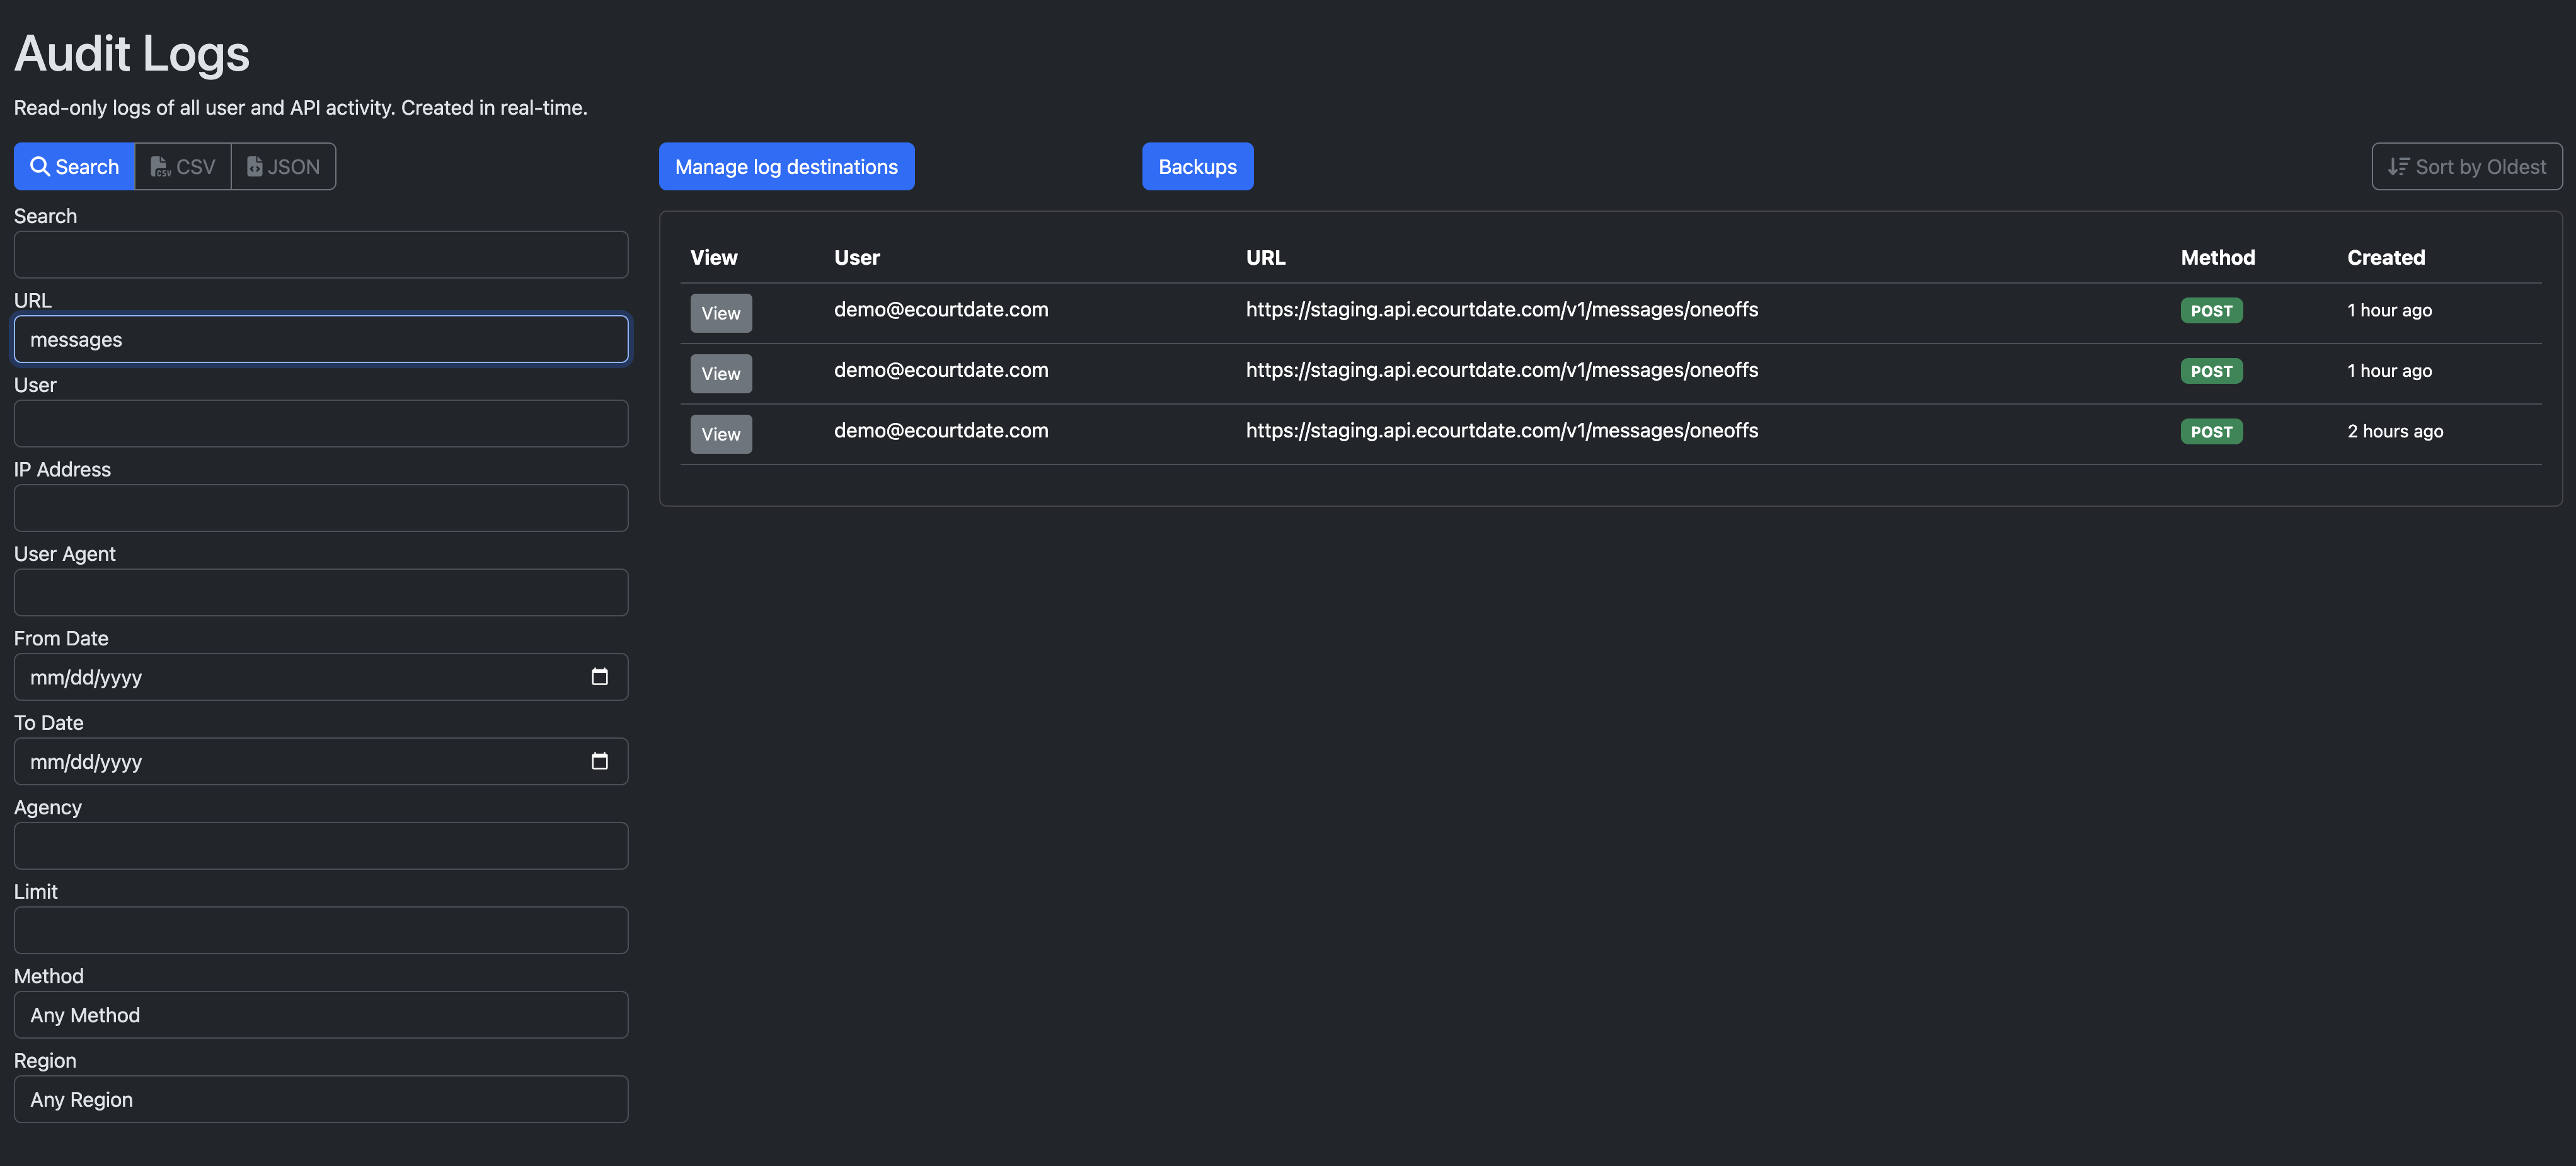
How to Check API Logs
You can view request and response logs in the Console under Logs.
You can filter logs by request data, request method, URL, IP address, User Agent, and more.
Troubleshooting
400 Bad Request
Ensure that the request body is valid and that all required parameters are included
401 Unauthorized
Ensure that you set the Authorization Header with the Bearer Access Token
Ensure that the API client is not revoked
403 Forbidden Agency is Inactive
Ensure that the agency is active
403 Permission Denied
Ensure that you are using an API client and not a user token
404 Agency Not Found
Ensure that you have a Default Agency configured
404 Not Found
Ensure that the API endpoint is correct
405 Method Not Allowed
Ensure that you are using the correct HTTP method
500 API Error
Check the API documentation for the correct request body and parameters.
API Support
If you have any questions or issues while using eCourtDate's API, please email help@ecourtdate.com.
To expedite resolving your support request, include a screenshot that shows the following:
- API Endpoint with any parameters
- Request Body
- Response Body
- Response Status Code
Do not share any sensitive information such as API secrets or access tokens in your screenshots.
We appreciate any feedback or suggestions to improve our API and developer resources.